Laravel 8 API Authentication using Laravel Sanctum
Introduction
Why go through the long haul😪 of Laravel Passport to build an authentication system for Single Page Applications when you have Laravel Sanctum 😎? In this guide, you'll learn how to build a basic authentication where users can register, log in and also log out with Sanctum as well as few other important details about Sanctum.
What is Laravel Sanctum?
Laravel Sanctum gives a lightweight authentication framework for Single Page Applications(SPAs) and token-based APIs. Sanctum permits each client/users of your application to create numerous API tokens for their account. These tokens may be allowed abilities/scopes which indicate the activities that tokens are permitted to perform.
Why Laravel Sanctum?
Here are some advantages of Sanctum😎:
It is lightweight because it uses Laravel's built-in cookie-based session authentication service.
It supports mobile application authentication.
It solves two basic problems:
- It provides a simple way to authenticate Single Page Applications (SPAs) like Angular, Vue or React.
- It issues API tokens to users without the complication of OAuth.
Now🥰, Let's start coding!🎉🎊✨
Step 1: Create a Laravel application.
You can use the laravel command or via the Composer package manager as follows:
laravel new project_name

or

composer create-project laravel/laravel project_name
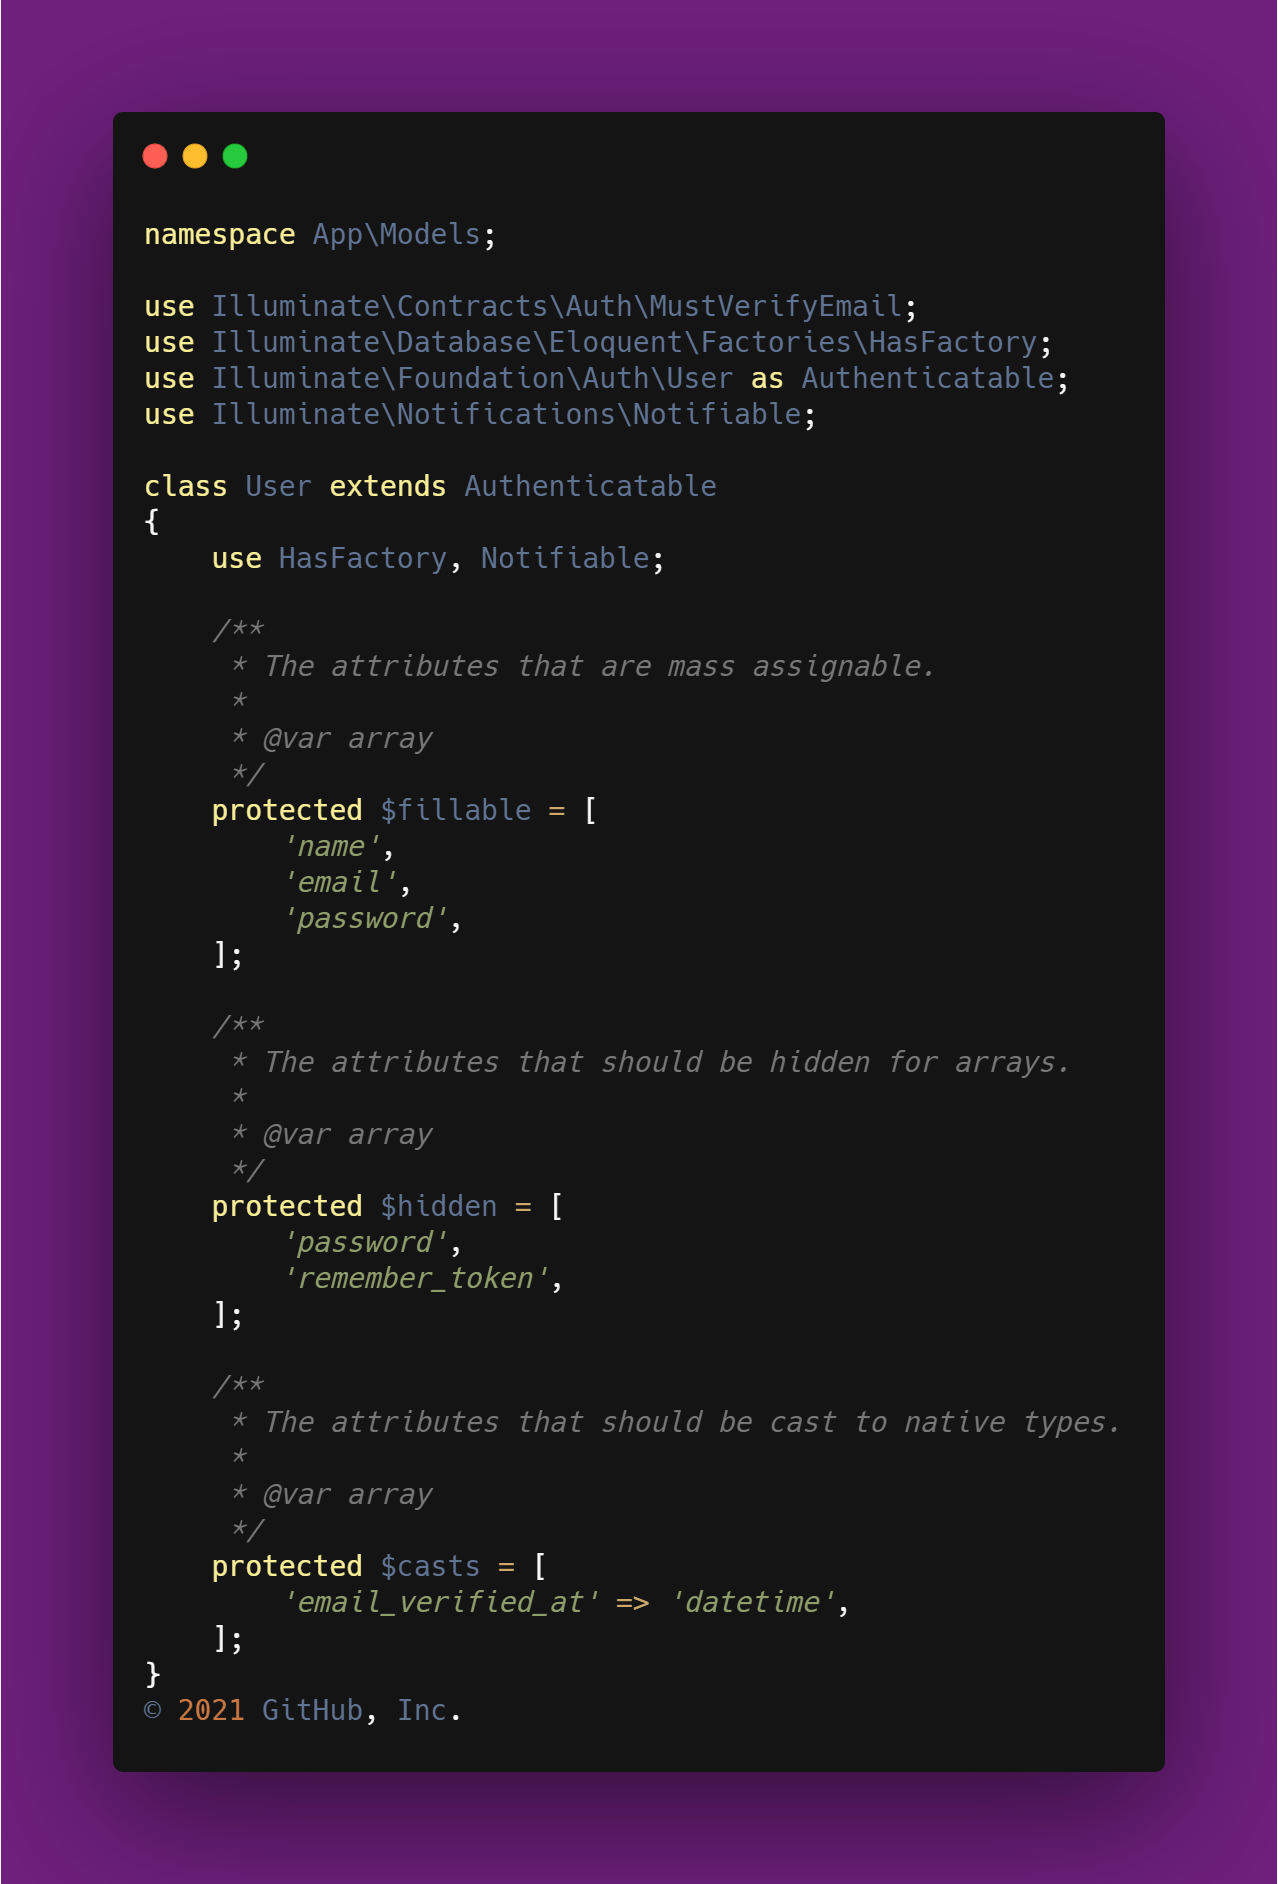
P:S: A laravel project comes default with a User model and migrations, you can create other models and migrations depending on your application. Here is a snippet of how they look like by default:
- Model
- Migration
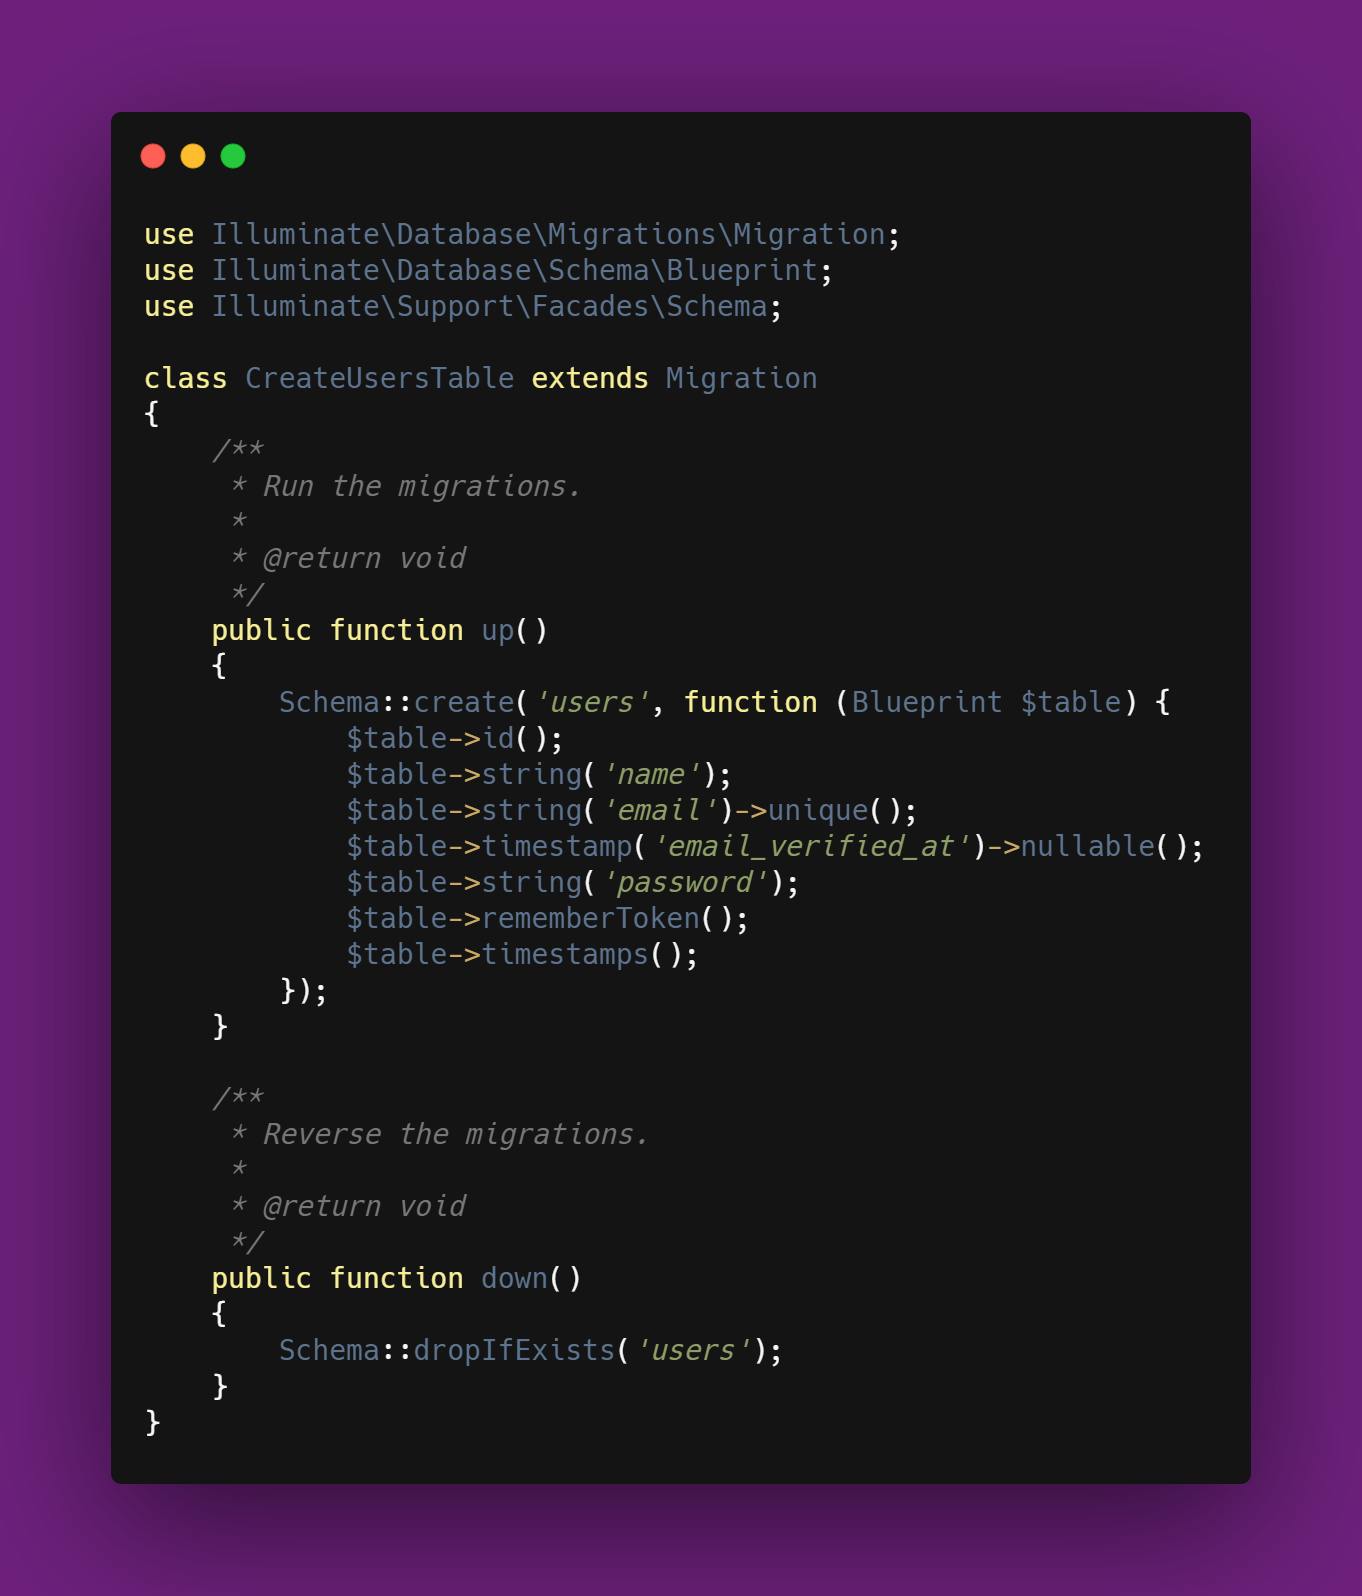
P:S: I have decided to continue with the default fields so I won't be making any modifications to the default User model and migrations. However, you can modify yours depending on your application.
Step 2: Establish a database connection.
Here is a guide I wrote in connecting your Laravel app to MySQL database . If your database is different, do well to connect it appropriately.
Step 3: Set up Laravel Sanctum
- Install Laravel Sanctum via the Composer package manager:
composer require laravel/sanctum
- Publish the configuration and migration files using the
vendor:publishArtisan command:
php artisan vendor:publish --provider="Laravel\Sanctum\SanctumServiceProvider"
- Lastly, run your migrations with the
migrateArtisan command:
php artisan:migrate
Note: If you plan to use Sanctum to authenticate SPAs then you should add Sanctum middleware to your api middleware group in app/Http/Kernel.php file:
'api' => [
    \Laravel\Sanctum\Http\Middleware\EnsureFrontendRequestsAreStateful::class,
    'throttle:api',
    \Illuminate\Routing\Middleware\SubstituteBindings::class,
],
Step 4: Update User Model
Sanctum allows you to issue Personal Access Tokens/ API Tokens to authenticate API request to your application.
To issue tokens for users, the User model should use the Laravel\Sanctum\HasApiTokens trait:
use Laravel\Sanctum\HasApiTokens;

class User extends Authenticatable
{
    use HasApiTokens, HasFactory, Notifiable;
}
P:S: The above code snippet shouldn't override the entire user model but update it.
Step 5: Set up Authentication Controller
In this controller define the register(), login(), logout() methods.
- Create the AuthController with
make:controllerArtisan command:php artisan make:controller AuthController Import the User model outside the AuthController class:
use App\Models\User;P. S: To issue tokens, a
createToken()method is used.Define the
register()method for users to register and get issued a token to make other API requests.public function register(Request $request){ $fields = $request->validate([ 'name'=>'required|string', 'email'=>'required|string|email|unique:users,email', 'password'=>'required|string|confirmed' ]); $user= User::create([ 'name'=>$fields['name'], 'email'=>$fields['email'], 'password'=> bcrypt($fields['password']) ]); $token = $user->createToken('myapptoken')->plainTextToken; $response= [ 'user' => $user, 'token'=> $token ]; return response($response, 201); }Define the
login()method for users to get logged in and issued a token to make other API requests.
public function login(Request $request){
        $fields = $request->validate([

         'email'=>'required|string|email',
         'password'=>'required|string'
        ]);

        //Check email

        $user= User::where('email', $fields['email'])->first();

        //Check Password
        if(!$user || !Hash::check($fields['password'], $user->password) ){
            return response([
                'message'=>'Invalid Credentials'
            ], 401);
        }

        $token = $user->createToken('myapptoken')->plainTextToken;

        $response= [
            'user' => $user,
            'token'=> $token
        ];

        return response($response, 201);
    }
- Define the
logout()for users to log out by revoking their tokens thereby they no longer have access to the protected routes until they log in again and are issued another token.
 public function logout(Request $request){
        auth()->user()->tokens()->delete();

        return [
            'message'=> 'Logged out'
        ];
    }
Step 6: Set up the Routes
All Laravel routes are defined in your route files, which are located in the routes directory.
Since we are building an API, our routes will be in the routes\api file. Now let's update our routes for register, login and log out.
use App\Http\Controllers\AuthController;

//Public routes
Route::post('/register', [AuthController::class, 'register']);
Route::post('/login', [AuthController::class, 'login']);
//Protected routes
Route::middleware('auth:sanctum')->post('/logout', [AuthController::class, 'logout']);
P. S: Note that the log out route is protected because only an authorized user who has logged in can log out.
We are all done coding! 🎉, Lets go to testing the API now.
Step 7: Test with Postman
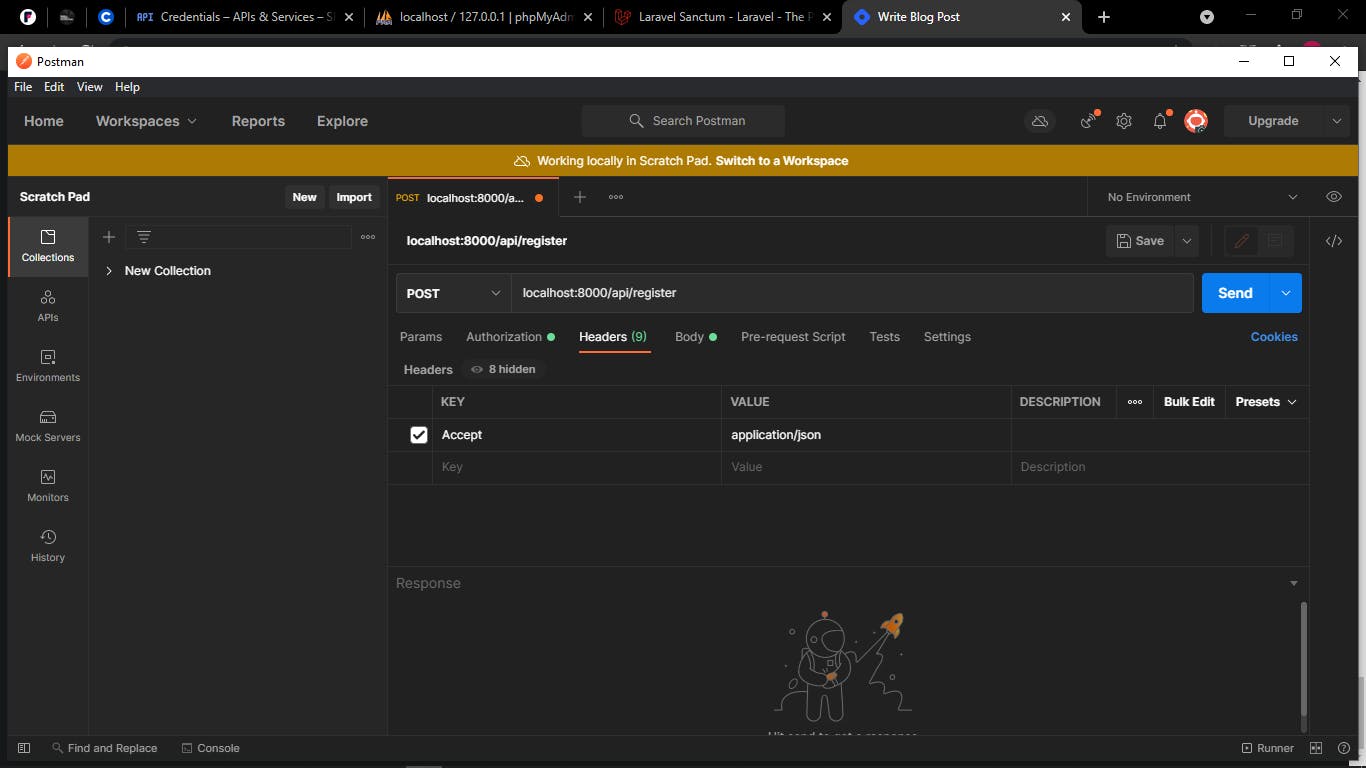
Before making any of these API requests, we need to set a header for the application to accept JSON data:
- Firstly, the registration function.
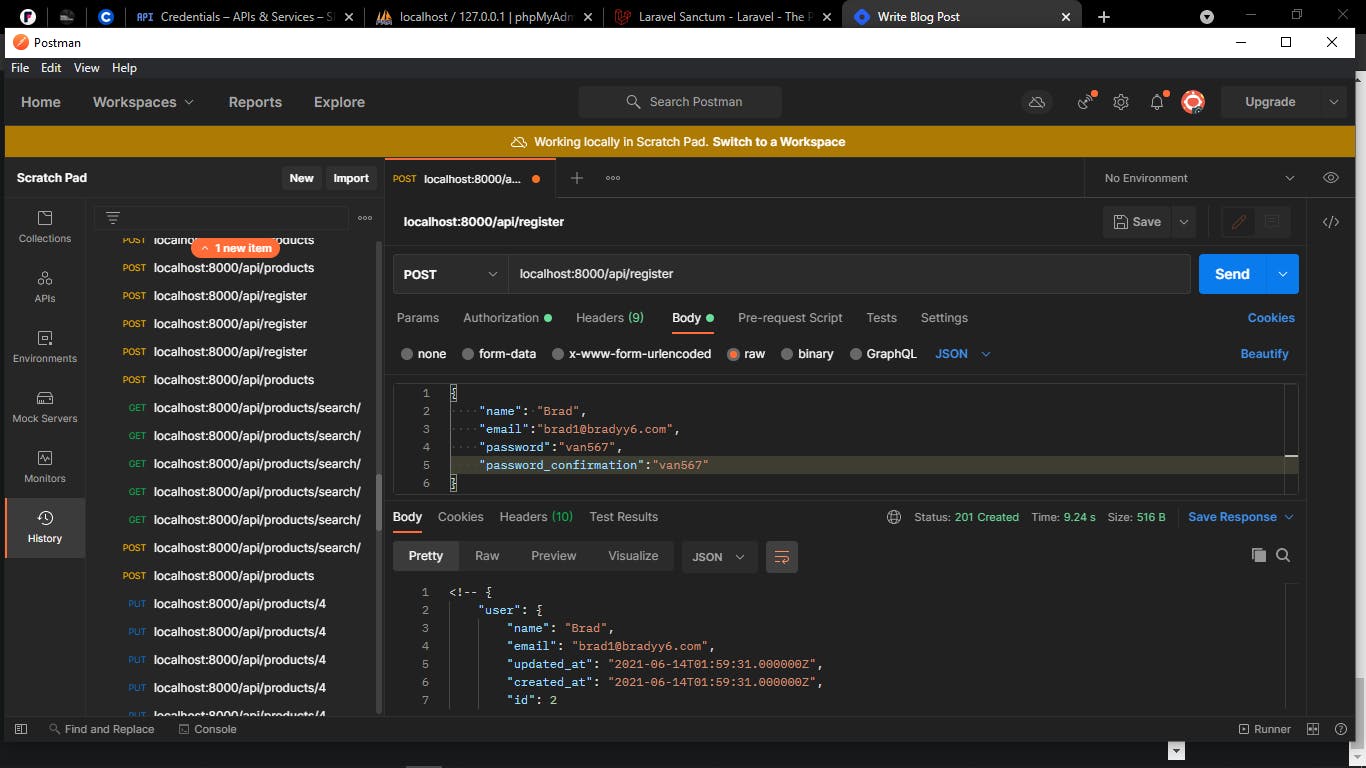
You're wondering why I get to use password_confirmation when it's not in my database? It's a validation rule I set to aids users to be certain of their password before submission.
- Next is the Login function.
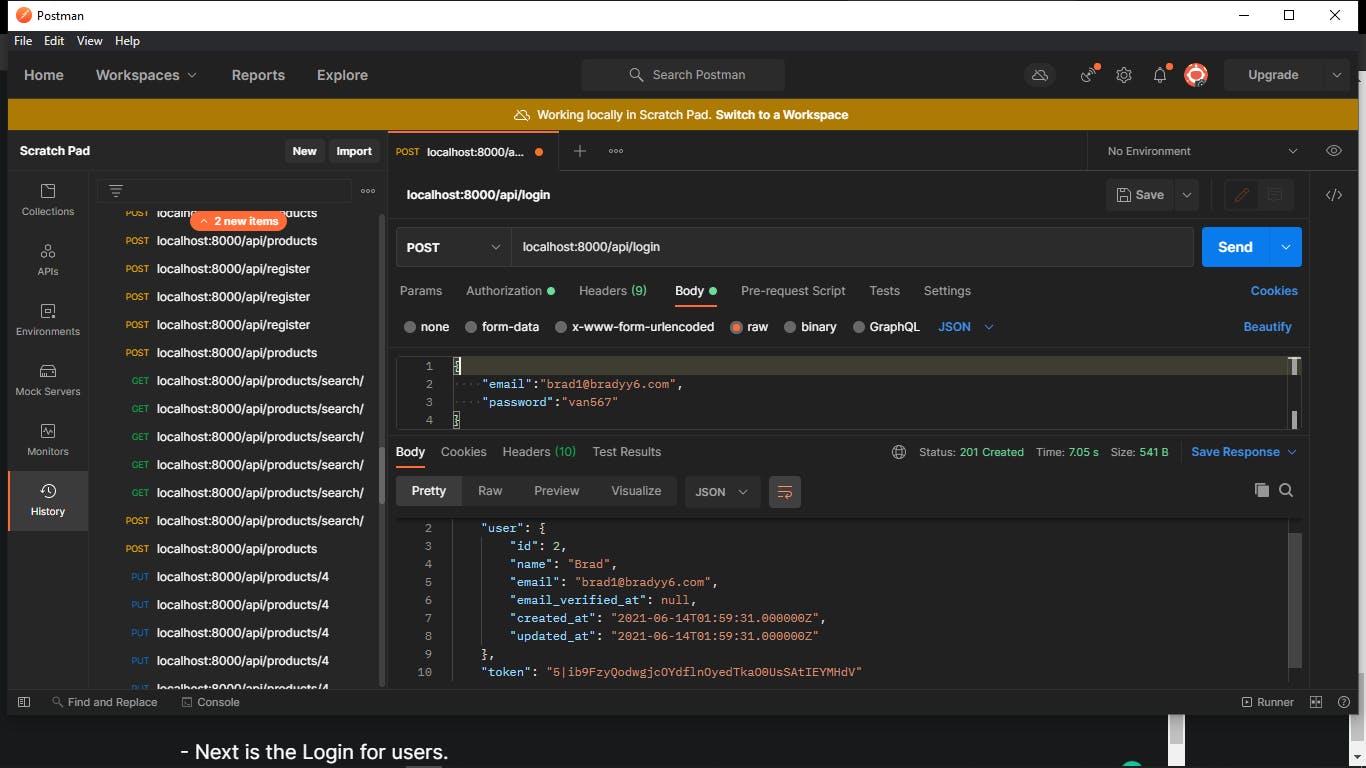
It returns a token for that user and now that token can be used to make any authorized request.
The above are public endpoints which mean anybody can access them. Let's try testing a protected endpoint that needs an authorized(logged in) user to make such a request.
For example, the log out function of the application can only be possible if the user has logged in, therefore it's a protected endpoint. You can also have some resources that you want only authorized users to see, it will definitely be a protected endpoint.
- Lastly, log out function.
The token that was given to the user at login will be set as Bearer Token in the Authorization for Postman to make a Log out Request:
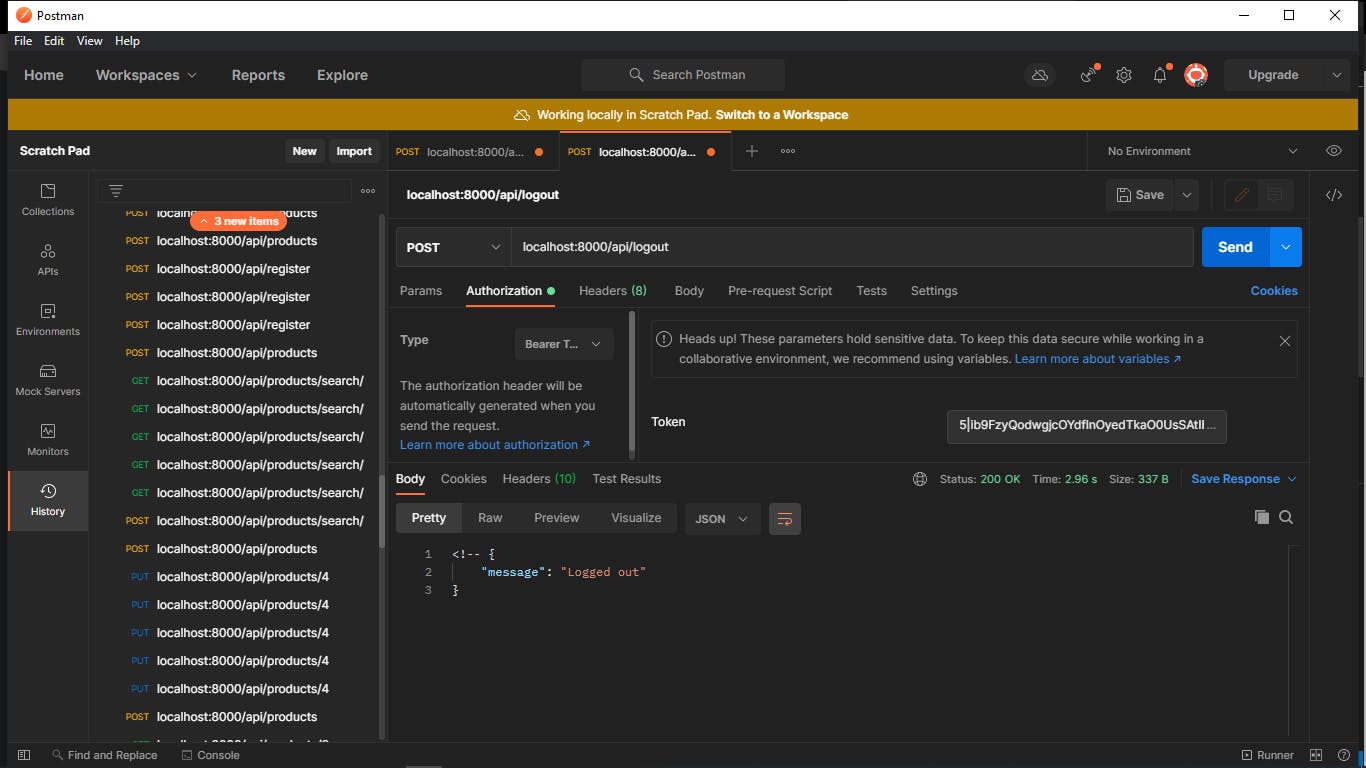
This particular users token is deleted and can't access any protected endpoint again until he logs in again and is assigned a new token.
Let's try to use that same token to log out again, it will tell us we are unauthenticated for this request:
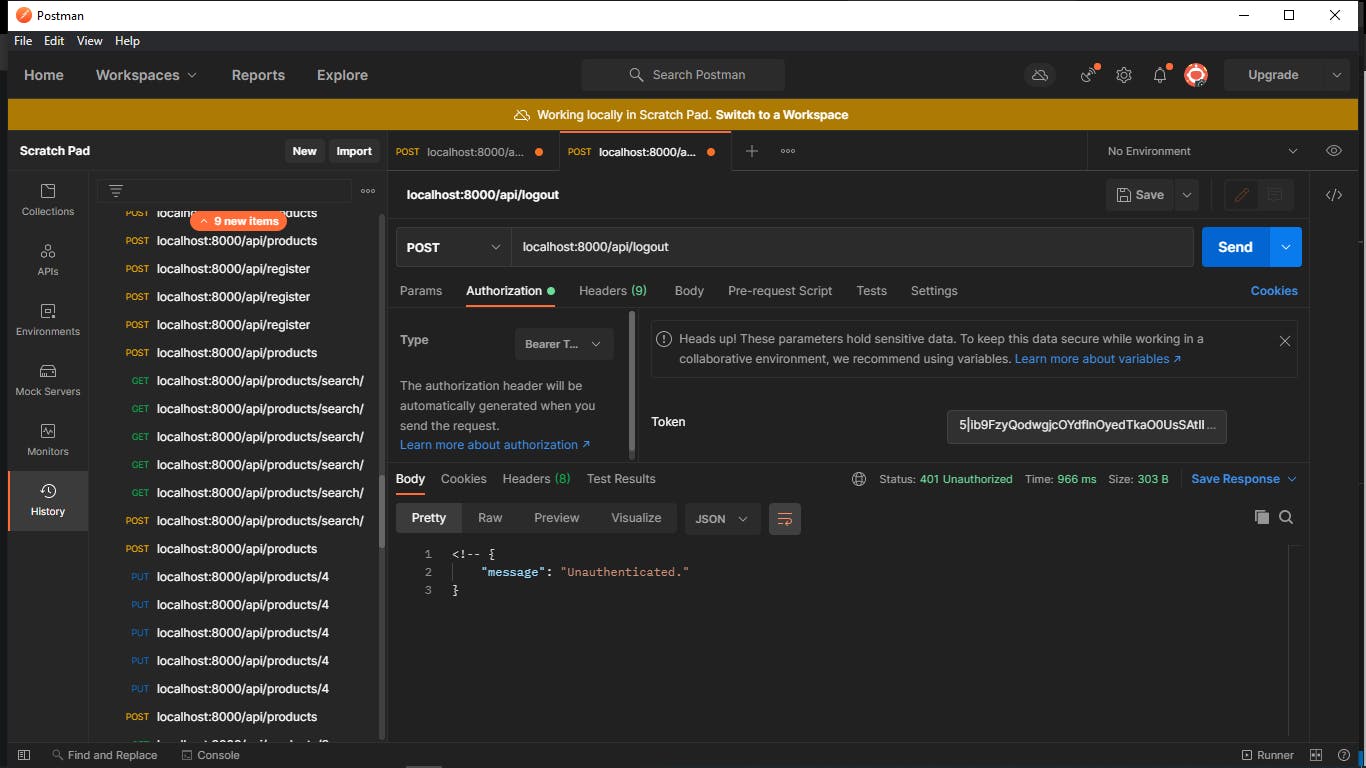
For further proof that the endpoint is protected , when we don't pass any token, it returns an unauthenticated message:
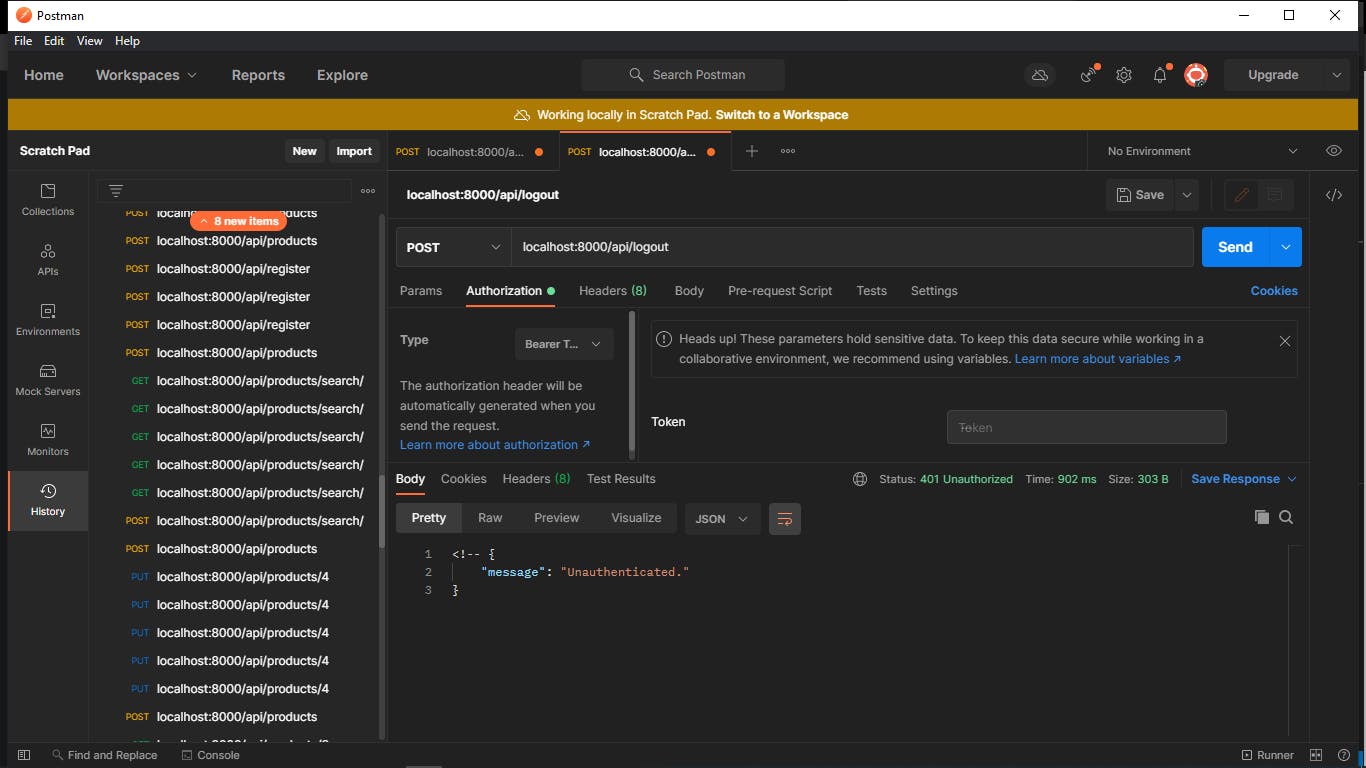
Conclusion
Wow! 😎You're great to go with Sanctum👍
I know somewhere along the article must've been overwhelming for some of us, so guess what🤩? I made the entire code for this article open-source on Github here . Do well to check it out for further clarifications(P . S: I have some extra resources and endpoints there too🤫).
I am open to contributions, comments, questions and further discussions. Thanks for reading🤝